Black Streaks on Laser Prints: How to Identify Drum, Blade, or Toner Defects
Black streaks on laser prints are one of the most visible and damaging print defects. Unlike mild density variation or slightly uneven output, black streaks are hard to ignore. They can run vertically down the page, appear as repeated dark bands, show up along one edge, or create dirty marks across documents that should look clean and professional.
For end users, the reaction is simple: the cartridge is bad.
For distributors, service companies, and B2B buyers, the situation is more complicated. Black streaks can come from several different sources: drum scratches, wiper blade failure, toner leakage, PCR contamination, developer roller defects, waste toner overflow, poor assembly, or printer-side contamination.
If the supplier does not know how to identify the true cause, the complaint becomes expensive. Cartridges are replaced without learning anything. The same defect may appear again in the next batch. Customers lose confidence. Service teams waste time cleaning printers and explaining failures.
A factory-level approach is different. It treats black streaks not as a single defect, but as a visible symptom of a specific failure inside the imaging system.
What Black Streaks Usually Look Like
Black streaks can appear in several forms, and each form gives clues about the likely cause.
Common patterns include:
- vertical black lines from top to bottom;
- wide dark streaks along one side of the page;
- repeated dark marks at regular intervals;
- random black smears;
- dirty edges;
- heavy black bands;
- streaks combined with gray background;
- streaks combined with toner leakage.
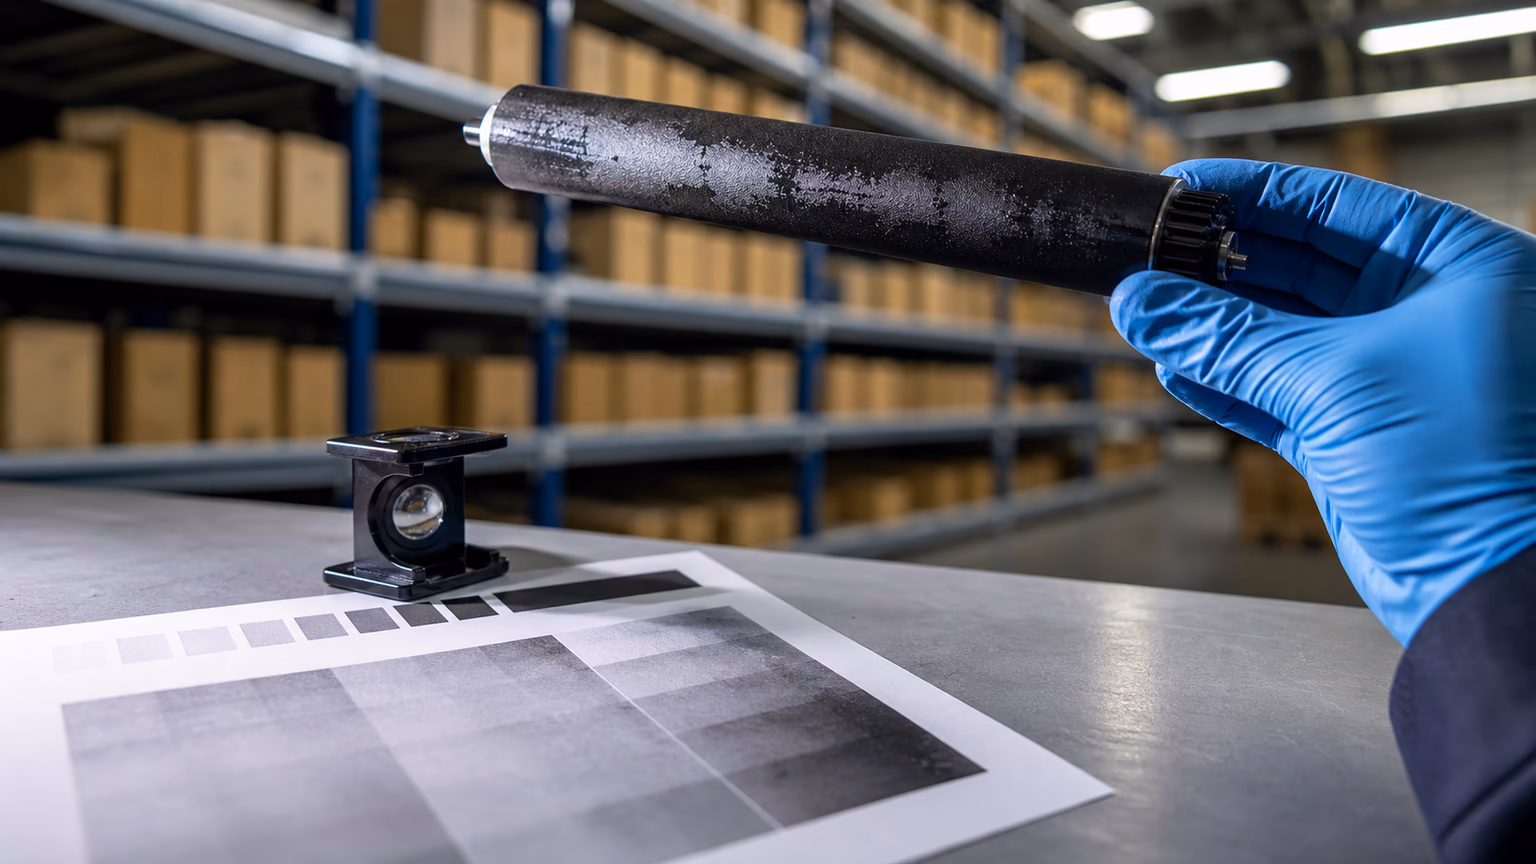
A clean diagnosis starts with the print sample. The pattern, direction, location, and repetition interval can often point to the affected component.
For example, a straight vertical line may suggest drum damage, blade contamination, or a scratch. A repeated mark may point to a rotating component. A dirty side edge may indicate leakage or waste toner escape. A broad smeared area may suggest internal contamination or developer system failure.
Black streaks are often connected to other defects.
If loose toner contaminates the cartridge or printer, streaks may appear together with toner leaking from the cartridge.
If the charging system becomes dirty, streaks may appear alongside compatible toner gray background.
If the drum or PCR fails to reset properly, streaks may be accompanied by ghosting after installing a new toner cartridge.
Root Cause 1: Drum Scratches or Drum Surface Damage
The photoconductor drum is one of the most common sources of black streaks. The drum carries the image before toner transfers to paper. If the drum surface is scratched, worn, contaminated, or damaged, the defect can repeat on every page.
Drum damage may appear as:
- thin vertical black lines;
- repeated marks;
- dark spots at regular intervals;
- bands in the same location;
- streaks that do not disappear after several pages.
The drum surface is sensitive. It can be damaged by poor handling, low-quality components, old remanufactured parts, contamination, paper dust, hard particles in toner, or blade friction.
In compatible cartridge production, drum selection matters. A low-cost drum may reduce the cartridge cost but increase complaint risk. A drum that looks acceptable during visual inspection may still have coating weakness, charge instability, or poor wear resistance.
A serious factory should test drum performance over time, not only on the first few prints. Some drum defects appear only after longer printing, after storage, or under temperature and humidity stress.
For buyers, black streaks with a consistent pattern should immediately raise the question: is the drum damaged, contaminated, or poorly matched with the rest of the cartridge system?
Root Cause 2: Wiper Blade Failure
The wiper blade removes residual toner from the drum after each print cycle. If it fails, toner remains on the drum and may appear as black streaks on the page.
Wiper blade failure is a major cause of vertical streaks and dirty printing.
Common blade-related causes include:
- blade edge damage;
- incorrect blade hardness;
- poor blade pressure;
- blade deformation during storage;
- contamination under the blade;
- poor lubrication;
- mismatch between blade and drum;
- reused blade beyond stable life;
- assembly angle error.
A damaged blade edge may leave a clear vertical streak. A blade with poor pressure may allow residual toner to pass unevenly. A blade that becomes stiff in low temperature may fail to clean the drum consistently.
Blade failure can also cause waste toner buildup. If the waste system cannot handle the residual toner, leakage and internal contamination may follow. This connects blade failure directly with toner leaking from the cartridge.
In factory testing, a few clean pages are not enough. Blade problems often appear after longer runs, when toner, heat, friction, and mechanical stress begin to interact.
Root Cause 3: Toner Leakage Inside the Cartridge
Loose toner inside the cartridge or printer can create black streaks quickly. If toner escapes from the hopper, developer area, seal, waste section, or blade system, it can contaminate the imaging path.
Leakage-related streaks may look like:
- dirty vertical marks;
- random black smears;
- heavy edge contamination;
- powder marks near one side;
- streaks combined with toner inside the machine;
- streaks after transport or installation.
This is why leakage complaints should never be treated as only a packaging issue. A cartridge may leak internally and still look acceptable from the outside. Once loose toner reaches the drum, PCR, developer roller, or paper path, black streaks can appear.
A detailed analysis of toner leaking from the cartridge should include seal strength, hopper design, doctor blade control, waste toner containment, transport vibration, and toner flowability.
For B2B buyers, leakage-related streaks are especially costly because they often require printer cleaning. A replacement cartridge may not solve the customer’s dissatisfaction if the printer has already been contaminated.
Root Cause 4: PCR Contamination
The primary charge roller, or PCR, charges the drum surface. If the PCR becomes contaminated, it may charge the drum unevenly and create streaks, background, or repeated marks.
PCR contamination can come from:
- toner additives;
- loose toner;
- paper dust;
- poor cleaning;
- waste toner migration;
- worn drum surface;
- environmental contamination;
- incompatible materials.
PCR-related streaks may not always be pure black lines. They may appear as dark bands, uneven background, repeated marks, or streaks combined with dirty gray areas.
This connects PCR issues with compatible toner gray background. A contaminated PCR can make the page look dirty overall, while also creating localized streaks or bands.
A factory should inspect PCR surface condition, electrical properties, material quality, and contact pressure. It should also test whether the toner formulation leaves residue after repeated printing.
For buyers, PCR contamination is important because it may appear after some usage rather than immediately. A cartridge may pass an initial sample test and fail after longer operation.
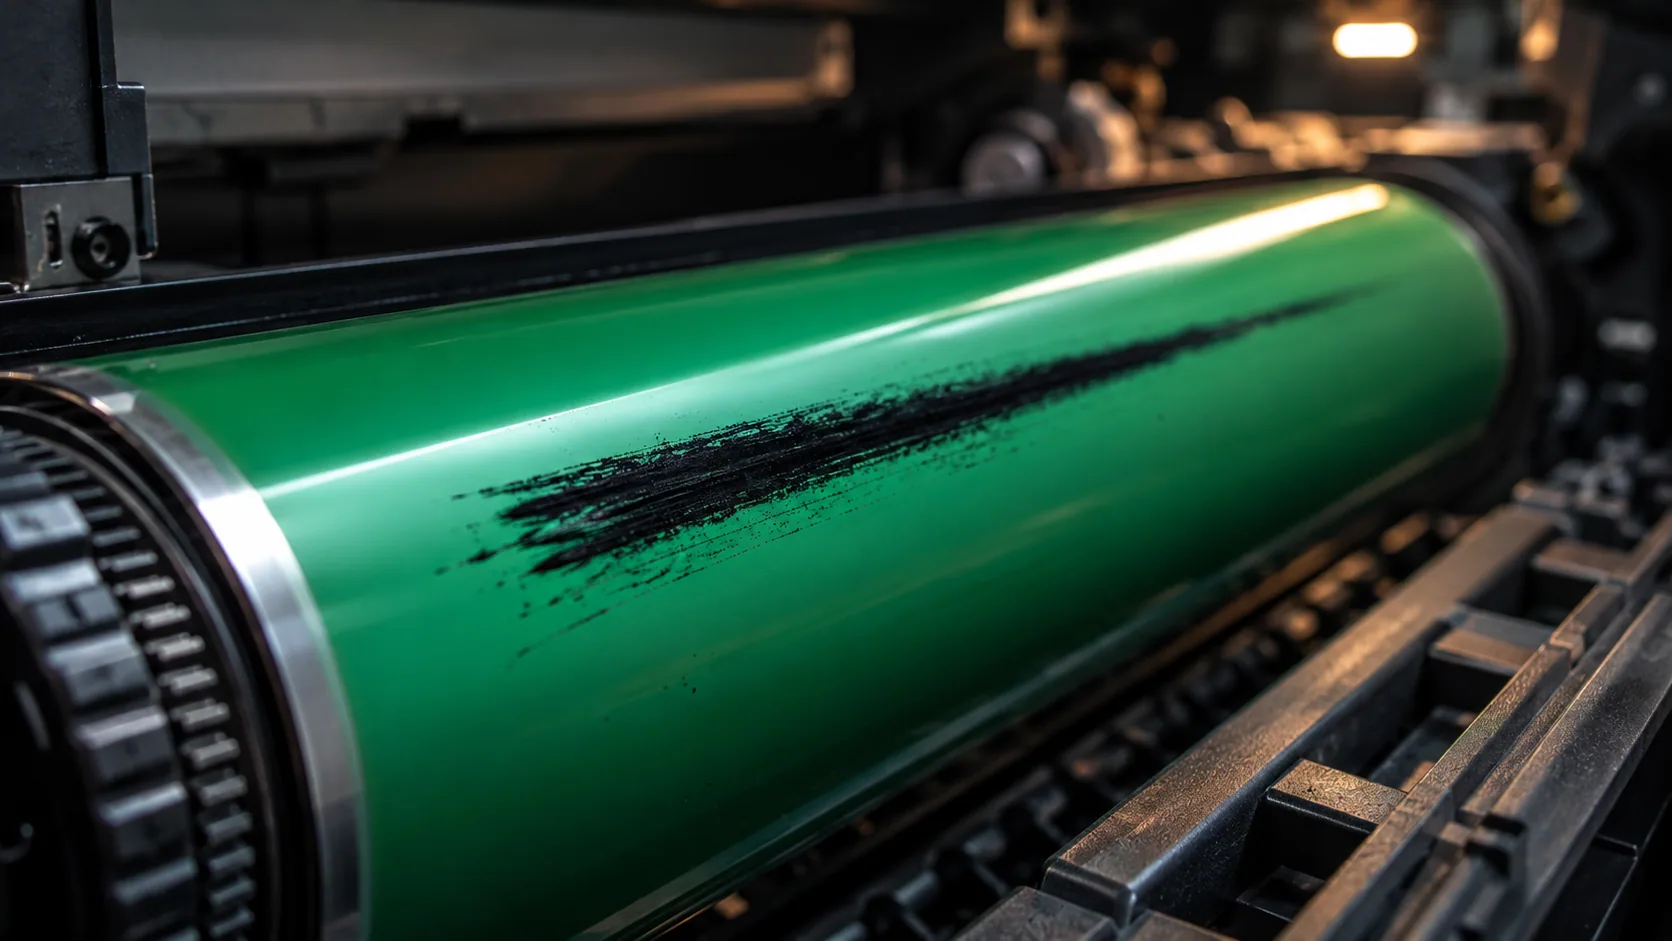
Root Cause 5: Developer Roller or Magnetic Roller Defects
The developer roller or magnetic roller controls how toner is delivered to the drum. If the roller surface is damaged, contaminated, uneven, or poorly coated, the toner layer may become irregular. This can create streaks, bands, density variation, and light or heavy areas.
Developer roller issues may appear as:
- vertical bands;
- uneven density;
- repeated streaks;
- weak print in one area;
- heavy toner in another area;
- streaks that follow roller rotation.
Causes include:
- roller coating defects;
- scratches;
- contamination;
- poor surface roughness;
- toner buildup;
- incorrect roller material;
- assembly misalignment;
- poor contact pressure;
- mismatch between roller and toner formulation.
Developer system defects can create both dark and light symptoms. If the roller carries too much toner in one area, black streaks may appear. If it carries too little toner, the page may show light print with compatible toner.
That is why density and streak analysis should be performed together. A defect may not be only a toner issue or only a component issue. It may be a mismatch in how toner and roller interact.
Root Cause 6: Doctor Blade Damage or Contamination
The doctor blade controls the toner layer thickness. If the blade has a nick, contamination, uneven pressure, or poor alignment, it can create streaks by allowing too much or too little toner in specific areas.
Doctor blade defects may cause:
- thin vertical streaks;
- dark lines;
- light lines;
- uneven toner layer;
- background;
- density bands;
- toner leakage near the developer area.
If the doctor blade edge is damaged, the defect often appears in the same location on each page. If toner buildup forms under the blade, streaks may appear gradually and worsen over time.
Doctor blade issues can also be connected to gray background and light print.
Too much toner can create dirty background.
Too little toner can create pale output.
Local blade failure can create a streak.
This is why compatible toner gray background, light print with compatible toner, and black streaks often share similar component-level causes.
A serious factory should inspect blade material, edge quality, assembly pressure, roller gap, and contamination control.
Root Cause 7: Waste Toner Overflow
During printing, residual toner must be cleaned from the drum and stored in the waste toner section. If the waste section overflows or is poorly sealed, toner can escape and create streaks.
Waste toner overflow may happen when:
- waste capacity is too small;
- wiper blade cleaning is inefficient;
- the cartridge is used beyond expected yield;
- residual toner generation is excessive;
- the waste hopper is poorly sealed;
- old toner remains after remanufacturing;
- high-coverage printing produces too much waste;
- cartridge design does not match real usage.
Waste-related streaks often appear later in cartridge life. The cartridge may print clean at first, then become dirty as waste toner accumulates.
For B2B buyers, this is important because page yield is not only about how many pages the cartridge can print before toner runs out. It is also about whether the cartridge can control waste toner through its usable life.
A cartridge that reaches its expected page count but becomes dirty halfway through is not a stable product.
Root Cause 8: Poor Cartridge Assembly
Even with good toner and good components, poor assembly can create black streaks.
Assembly-related causes include:
- misaligned drum;
- incorrect blade pressure;
- loose end caps;
- poor roller contact;
- damaged seals;
- contamination during assembly;
- missing lubrication;
- cracked shell;
- incorrect torque;
- dust inside the cartridge.
This is why factory process control matters. A manufacturer must control not only incoming materials, but also operator training, assembly procedures, inspection checkpoints, and final testing.
In low-cost production, assembly defects may be treated as acceptable loss. For B2B supply, they are not acceptable because one defective cartridge can damage trust in the entire shipment.
A stable supplier should be able to explain how assembly quality is checked and how batch problems are traced.
Root Cause 9: Printer-Side Contamination or Maintenance Issues
Not every black streak is caused by the cartridge. The printer itself may be contaminated or worn.
Printer-side causes include:
- dirty paper path;
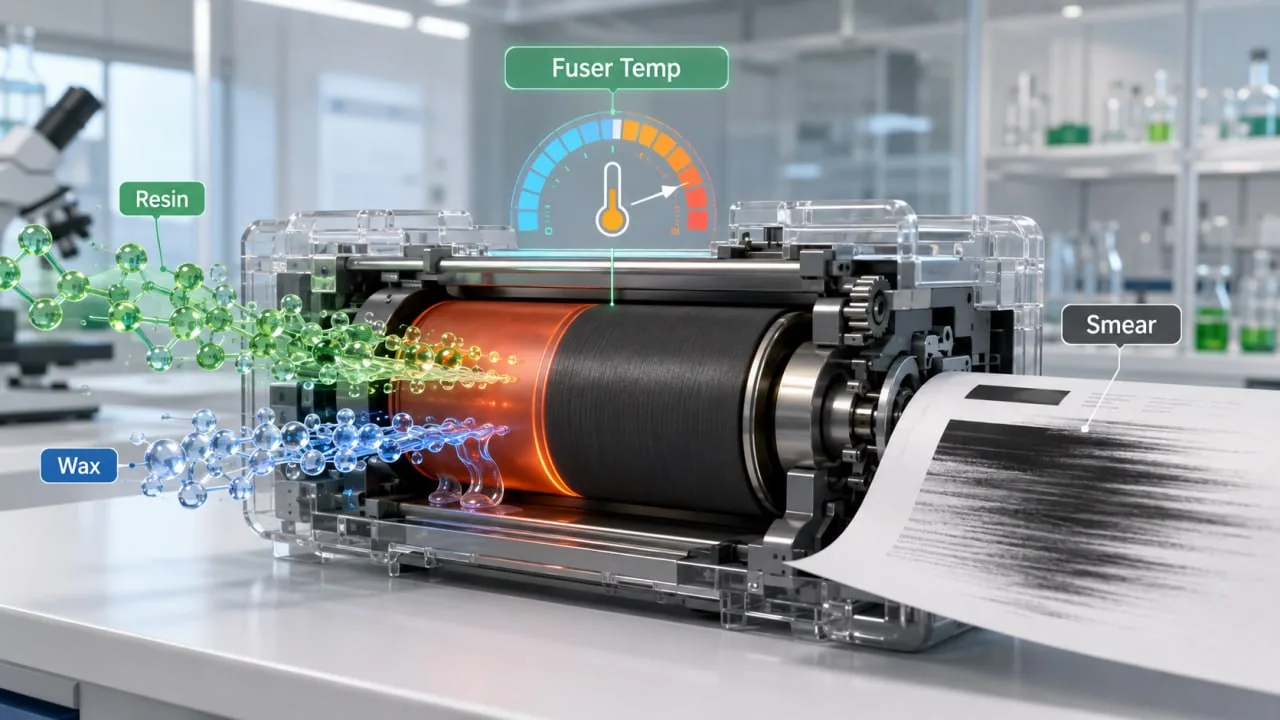
- worn fuser roller;
- damaged transfer roller;
- old drum unit in systems where drum is separate;
- paper dust buildup;
- poor maintenance;
- previous cartridge leakage;
- damaged internal roller;
- humidity-related contamination.
This is especially common in fleets where printers use many cartridges over time. A previous leaking cartridge may contaminate the machine, and the next cartridge may be blamed unfairly.
A fair diagnosis should test:
- the suspect cartridge in another printer;
- another cartridge in the same printer;
- printer interior cleanliness;
- fuser condition;
- transfer roller condition;
- paper quality;
- previous complaint history.
This protects both buyer and supplier. It prevents false blame while still identifying real cartridge defects.
How to Read Streak Patterns
The print sample gives useful information. Buyers and technicians should look at the pattern carefully.
Thin vertical black line
Likely causes:
- drum scratch;
- blade nick;
- doctor blade contamination;
- debris in imaging path.
Wide vertical dark band
Likely causes:
- developer roller issue;
- PCR contamination;
- uneven toner layer;
- internal leakage.
Repeating black marks
Likely causes:
- drum defect;
- fuser roller contamination;
- PCR issue;
- roller damage.
Random black smears
Likely causes:
- toner leakage;
- loose toner in printer;
- poor fusing;
- contamination during transport.
Dirty edge on one side
Likely causes:
- end seal failure;
- hopper leakage;
- waste toner escape;
- poor cartridge alignment.
Streaks plus gray background
Likely causes:
- PCR contamination;
- toner charge issue;
- internal toner contamination;
- blade control problem.
This kind of practical pattern reading helps buyers communicate with suppliers more effectively.
Factory-Level Diagnostic Process
A serious factory should diagnose black streaks through a structured process, not guesswork.
The process should include:
- Collect print samplesAnalyze streak direction, width, repetition, and location.
- Check cartridge model and batch numberDetermine whether the complaint is isolated or batch-related.
- Inspect drum surfaceLook for scratches, wear, contamination, or coating defects.
- Inspect wiper bladeCheck edge condition, pressure, deformation, and cleaning ability.
- Inspect doctor bladeLook for toner buildup, edge damage, and alignment issues.
- Inspect PCRCheck for contamination, uneven surface, or charge problems.
- Inspect developer rollerEvaluate coating, toner layer, and surface defects.
- Check waste toner sectionLook for overflow, poor sealing, or internal toner escape.
- Test in multiple printersSeparate cartridge defect from machine defect.
- Compare with retained batch sampleConfirm whether the issue is repeated in batch stock.
- Review production recordsCheck component supplier, assembly line, operator, inspection logs, and shipment records.
This is the difference between complaint handling and real quality control.
How Buyers Should Respond to Black Streak Complaints
When black streaks are reported, buyers should avoid vague communication. A clear complaint package helps the manufacturer respond properly.
Buyers should collect:
- photos of printed pages;
- photos of the cartridge;
- photos of any leaked toner;
- printer model;
- cartridge model;
- batch number;
- page count when defect appeared;
- whether the defect appeared immediately or later;
- whether another cartridge was tested;
- whether the printer was cleaned;
- storage and transport conditions.
This information allows the supplier to identify whether the issue is drum, blade, toner, leakage, printer, or transport related.
For distributors, this also protects the relationship with the end customer. A professional response shows that the supplier is investigating, not simply avoiding responsibility.
Preventing Black Streaks Before Shipment
Prevention requires control across the full cartridge system.
A manufacturer should control:
- drum quality and handling;
- blade material and edge consistency;
- PCR cleanliness;
- doctor blade alignment;
- developer roller surface quality;
- toner formulation and flowability;
- waste toner capacity;
- assembly cleanliness;
- seal strength;
- packaging and transport protection;
- final print testing;
- retained sample records.
Black streaks often happen when one small detail is neglected. A tiny blade defect, a little contamination, a weak drum coating, or one poor assembly step can create a visible page defect.
For this reason, final inspection should not be only visual inspection of the cartridge body. It should include print testing and defect pattern recognition.
Why Black Streaks Matter for B2B Buyers
Black streaks create a direct commercial risk.
For offices, they make documents look unprofessional.For schools, government buyers, and institutions, they reduce trust in procurement decisions.For service companies, they create calls and cleaning work.For distributors, they increase returns and complaints.For private label brands, they damage the brand printed on the box.
A black streak complaint is rarely ignored. It is visible, easy to photograph, and easy for the customer to blame on the cartridge.
That is why suppliers must treat black streaks as a serious quality signal, not a minor defect.
Relationship Between Black Streaks and Other Defects
Black streaks often overlap with other print-quality problems.
If the PCR is contaminated, the cartridge may show both streaks and compatible toner gray background.
If residual image remains on the drum or fuser, streaks may appear together with ghosting after installing a new toner cartridge.
If the developer system is not carrying toner evenly, the page may show streaks and light print with compatible toner in different areas.
If loose toner escapes internally, streaks may follow toner leaking from the cartridge.
For this reason, a strong manufacturer does not diagnose each defect in isolation. The page may show one visible symptom, but the root cause may involve multiple parts of the cartridge system.
How UNICO Approaches Black Streak Analysis
At UNICO, black streaks are treated as a component-level and system-level defect. The analysis looks at drum condition, wiper blade cleaning, doctor blade control, developer roller surface, PCR cleanliness, toner leakage, waste toner containment, and printer-side factors.
This approach is important because different causes can create similar-looking streaks. A drum scratch, blade nick, leakage path, and contaminated roller may all produce dark marks, but the corrective action is different.
For B2B buyers, that means the supplier must be able to do more than replace a cartridge. It must be able to explain the root cause and prevent recurrence.
Stable compatible toner supply depends on this kind of discipline. The market does not need more cartridges that look acceptable in a price list. It needs products that remain clean, consistent, and predictable in real customer use.
FAQ
Why are there black streaks on my laser prints?
Black streaks on laser prints may be caused by drum scratches, wiper blade failure, doctor blade contamination, toner leakage, PCR contamination, developer roller defects, waste toner overflow, or printer-side contamination.
Final Thoughts
Black streaks on laser prints are not random. They usually point to a specific failure in the drum, blade, toner, roller, waste, leakage, or printer system.
For B2B buyers, the important question is not only whether the supplier will replace the cartridge. The real question is whether the supplier can identify the cause and prevent the defect from returning in the next shipment.
A reliable compatible toner manufacturer should control the full imaging system: toner, drum, blades, rollers, seals, waste path, assembly, and testing.
That is what turns compatible toner from a low-cost alternative into a dependable B2B supply solution.
Related reading: ghosting after installing a new toner cartridge, ghosting after installing a new toner cartridge, compatible toner gray background, toner leaking from cartridge, light print with compatible toner, toner leaking from cartridge.